Showing posts with label DIY. Show all posts

7.18.2012

house projects: nothing a little paint can't fix

In between flower shop dreams and resume tweaking and box unpacking, I've had some time for a little paint therapy. Even painting a big black box on an old door is a nice brain break from the to-do lists.

My parents found this headboard at an estate sale where it was kind of plain and an icky brown. I picked up an ornamental raw wood piece and attached it with wood glue to the top. Ignore the fact that it's the tiniest bit too big for the space. I loved it too much to let that bother me. D rigged up the base so that it'd be taller [love a man that can rig], and I painted it with a light french grey that I expected to be a little darker.


In the spirit of parental finds, my dad practically plundered [legally, that is] a house being torn down which their church had purchased. He handed down one of the many doors which I decided to turn into a kitchen chalkboard. Not terribly original - but definitely usable!


Three cheers for my parents and their awesome estate sale skills!

7.02.2012

...and grow vegetables in the dirt!

I'd first like to take a moment to thank the City of Columbia for the warm welcome. And by warm welcome I mean a record heat index of 115 degrees.

So, on Saturday, we did what any normal people would do: ran errands in a dark-colored car and worked in the yard.

But finishing my long-wished-for project was well worth braving the heat.


I do realize that herbs are not vegetables [right?], but I had to work in that line from my favorite movie. A sprig of rosemary to anyone who knows it! If you know the rest of the line, I'm pretty sure I went to Publix with potting soil on my dress. And my face. That should count as "ugly clothes."

Just in case you have planting plans too, this video from The Kitchn was incredibly helpful to this clueless gardener.


Come visit for some basil pesto, mint tea, and rosemary bread! After all, "...we're supposed to wear funny looking hats and ugly clothes and grow vegetables in the dirt."


3.26.2012

DIYable: mini chalkboards

Happy Monday, y'all! I'm happy to report that there is sunshine in the forecast for each and every day this week. Small blessings!

This weekend was full of girlfriends and teeny tiny baby clothes and daisies and cupcakes. Yes, it was as great as it sounds. Friday night, I ate dinner with these ladies. I had every intention of not staying long because of the cupcakes that needed baking and the flowers that needed arranging for the shower the next morning. But I couldn't. We ate and talked and ate and talked. On the menu: Mere's pork chops, good bread, salad with strawberries, drunken goat cheese, chocolate, and change. All things good for the soul.


Before I go on and on and on about how fab-u-lous the shower was, here is a little DIY. I was really wanting these for future entertaining. But in the interest of time and the budget and in the spirit of repurposing, I decided my muscle man and I could make them out of pallet wood and chalkboard paint.

I wanted to make twelve, so I chose three of the pallet slats that were closest to the same size. Because of holes and metal scraps, you won't be able to use the entire slat - so keep that in mind.


It would certainly have been easier to use a circular saw, but poor D has no place to use it in apartment life. Next year, maybe! But they are totally handsaw-able. He cut them every 2 1/2 inches.


Seeing as how I was born unorganized, I couldn't find my package of sand paper. Nail files will suffice. I'm not kidding. Sand/file down the rough edges and the entire side that you plan to paint.

I wanted the chalkboard paint to be in a shape something other than just rectangular, so I hand sketched them onto each block. I'm totally OK with each of them looking a little imperfect. But, if you are not, stencils would work great for you.


Then paint and let dry and paint again and let dry again. I believe the chalkboard paint instructions tell you to lightly sand in between the two coats.


And then...


Free for me! I do plan to get a liquid chalk pen that will look nicer on the blocks.

3.16.2012

have a relaxing weekend

This week has been a little nuts-o here at the ol' capitol. When will it end, you ask? June.


I have never been so happy to see Friday. And Saturday too. Hellooooo Saturday.


Things I'm looking forward to this weekend:

Not spending a solid 16 hours at work in one day.

Date night with D - it's my turn to plan the surprise this week!

Sporting my new pink khakis.

DIY-ing the heck out of some old pallet wood and chalkboard paint to make myself some of these for future showers and parties.

Dreaming up some bridal and baby shower wreaths. How pretty would these felted billy balls and this ribbon be?

Giving our apartment a little attention for the first time this week with homemade tub scrub [thanks Martha!].

And giving my hands a little attention as well. No more scaly hand shakes for you!

Last but not least and since I like to claim my Irish heritage [at least] once a year [hello - MCMAHONE], I might just be making this yummy sounding bread. Though I don't know if I'll like it. It's really more in the spirit of the holiday! So maybe I'll just make green pancakes.


Happy end of the week to ya!

3.09.2012

confessions of a morning shower-er

The fact that I've always had to shower in the morning made me feel like this:

[doesn't this make your heart feel like someone is tap dancing on it?!]

I completely accepted the fact that I always had to wash my hair in the morning. And, on top of that, I always had to wash my hair. Period. With Legislative Session beginning on Monday, being late and tired and frizzy and half make up-ed is not an option.

BUT...

[Yes, there is a but. Which means there is hope for all you fellow morning shower-ers.]

...I've found some loopholes. They have brought the opportunity to shower at night, go to bed with wet hair, and have much more morning time. And I love morning time.

Now I haven't tried all of these ideas, but I certainly plan to! Ch-ch-check 'em out. And let me know if any of them completely change your life.

Sweet old fashion rag curls.

And curls with a headband [I love her accent!].

Or maybe even some knots.

A pretty braid I'm dying to try [grow, hair, grow!].

And another braided up-do that is perfectly classy.

A DIY for the ever-coveted Bumble and Bumble Surf Spray.

Two products that choose to not live without.

A recipe for make your own make up remover. 

And quick fixes for morning makeup.

Happy weekend! I'll be doing some shower prep [the baby and bridal kind], spending time with a friend who I haven't seen since 2011, and researching House committees. Yahoo!

2.29.2012

wedding wednesday: it's back

Do you remember all of these?

After August 6th, I took a long break from the wedding world. I didn't read the blogs. I stopped following all wedding boards on Pinterest. I gave away the Brides magazine tower. Consider it a little wedding planning brain cleanser. It was a smart move - I didn't want to continue to be fed all these great ideas and wish we had incorporated them. Our day was perfect to us, and that's how I always want to remember it. The moral of this story is, after your own wedding, rid yourself of the wedding business for a while.

And fill the void with pictures of dream homes and difficult recipes. That's healthy, right?

But the truth is, I have always loved weddings and always always will. Not too long ago, I got really excited about being involved in the wedding process again when Audrey gets married. Again, she's four. I've also collected a couple of pieces of advice that one can only learn by going through the [awesome] process of planning a wedding. So Wedding Wednesday is back for a few weeks. This time I'd like to share with you a few of my favorite DIY projects that we cranked out with some amazing friends and family.

Surprisingly, we didn't plan for too many do it yourself projects because the hand-crafted look [which I still love] was not what we were going for. Here are my three faves:


My very handy Father of the Bride crafted these letters out of two layers of heavy duty foam board. The kind from Lowes, not Hobby Lobby. I chose the font, and he printed them on a ginormous printer they have at his office to print maps. You could easily have it printed in a poster size at Kinkos, use a projector, or freehand it. I chose a matelasse fabric and began the ultimate brain teaser of wrapping these suckers. Just think of it as wrapping a present but with lots of nooks and crannies to keep smooth. The trick to getting the fabric to stay was straight pins! They worked like magic. No glue. No tape. Just straight pins to the rescue.

Our florist attached ribbon and the clusters of fresh flowers before hanging them on the front doors of the church. Hopefully, they were a very pleasant welcome to our guests!


Our program inspiration came completely from this photo. It ended up being six pages long. Yes, six. I downloaded the fonts I wanted to use from dafont.com and created the monogram on Wedding Chicks. I designed the layout using Publisher because I have a Photoshop phobia that I'm slowly overcoming. Maybe it's some scarring from my not-so-nice adviser during my yearbook editor days.

I ordered the cardstock from Sams who has free shipping [!!!] and had them professionally printed. The Kinkos man was thankfully super patient with me as checked and double checked and asked to see his computer screen about eighteen times.  They have a small fee for cutting the printed sheets in half which was absolutely worth it. I would have probably paid $1,000 to not have to cute over three hundred sets of programs in half.

I rallied the troops to cut corners, punch holes, stick reinforcers, cut and tie ribbon, and stuff and glue envelopes with tissues. I dug out a program from our stack of wedding memorabilia [which is in terrible need of organizing] to show you my very favorite page: For Happy Tears. Yes, my family and friends stuck millions of little hankies into envelopes before gluing them on a page all because of my bright idea. Yes, I owe them big time. But isn't it adorable?!

Last but not least - the photo wall. I loved having it. I almost died making it. A word to the wise: have a handy fiance [which I did] and stay calm when the wallpaper won't stick for the eighth time because of the humid July air [which I didn't]. Instructions can be found here.

More Wedding Wednesdays to come. I'm back on the bandwagon. And loving it!

2.22.2012

make it yourself

I'm on this frugal and healthy high, y'all. I'd say I feel like a pioneer woman, in the generic sense, but that would make you think of Mrs. Ree herself. And never will I be on that level.

All I've done is make my own granola and Febreeze. But that's a start, right?!

I took an unplanned nap on Sunday afternoon which made it impossible to sleep the entirety of the following night. So, at 4:15 Monday morning, I decided I needed a project. The make-your-own Febreeze was the easiest process ever, so I needed another project by 4:22. But it was a success! Follow the link, make your own, and save you bundle.

[Next: tub scrub, laundry detergent, and dishwasher detergent]

As for the granola, I used this basic granola recipe to create my own. I am so very happy with how it turned out. The recipe is below, but feel free to half it if you don't need enough granola to survive the apocalypse.


MJ's Favorite Granola

8 cups rolled oats
1 cup wheat germ
1 cup sliced almonds
1 cup chopped walnuts
3/4 cup olive oil
3/4 cup honey
2 teaspoons vanilla
2 teaspoons cinnamon
1/2 teaspoon salt

Mix every ingredient in the largest mixing bowl you've ever seen. Spread half the mixture on a cookie sheet [I used a silicone baking mat]. Bake for 25 minutes or longer if you want it a little more crunchy [but don't let it burn!] and stir every 7-10 minutes. And then do it again with the second batch. Enjoy it on nearly anything!

[What I'm Loving Wednesday]

2.21.2012

repurpose

My Valentine gifted me with Country Living's Restore. Recycle. Repurpose.: Create a Beautiful Home, and I'm already drooling over its great ideas and beautifully framed photos. Randy Florke has been pretty inspiring so far. I mean, I already saved a pickle jar. And since my hunt had proven to be quite unsuccessful, I made my own gold chain link bracelet. That would be called repurposing. You know - like the title says.


I know. It was an impulse buy. I think I wore it once. But after a little seam-ripping and link removal, it lives on as a bracelet.


I've got to be careful - this makes me feel like I could be the next Bear Grylls or something. Bracelet? Grizzly? Same level, right? Three cheers for fashion survival!

1.22.2012

DIY-ing together

Last night, Caitlyn hosted a girls craft night. It was all things girly and the perfect reason to get together, if you ask me. As the modge podge and embroidery floss flew, so did the shared stories, unexpected connections, and really awesome snacking.


The night saw the creation of everything from yarn wreaths to wrap necklaces to silhouette creations to deck of cards valentines to salt dough jewelry.


I dreamed up a little embroidery project with part of one of D's favorite Bible verses. It was super easy. I used a water and air soluble marker to draw my design and the good ol' back stitch. For future reference, the marker functions much like an disappearing ink pen that you get for selling the most magazines in your class or that comes in a detective toy set. This means that I should not draw the design the night before and expect it to be there 24 hours later. Lesson learned, disappearing marker. Lesson learned.


We ended the night with a little Center Stage. Could it get more [girly and] perfect?

1.15.2012

wheelin' and dealin': pottery barn-esque ribbon

Hi y'all. It's been five days. How did that happen? If the writing inspo doesn't flow, the writing doesn't happen. But that little dry spell is over, and I've got myself an idea list.

And some [big] news that I'd really like to share with you. That's tomorrow.

But for today, check out this awesome buy from Hobby Lobby. I was actually shopping for a denim patch to repair the gaping hole in the part of my jeggings where holes shouldn't be allowed. Anyway, I spotted this, had a moment of blackout from disbelief when I realized what a good price it was, and then snatched it from the shelf as if someone was going to come wrestle it from me.

I saw some nearly-identical ribbon like this in Pottery Barn's Christmas collection. It was a small roll for over $16. This, on the other hand, was 69 cents a yard!


I used half for it a wreath I can use all year. As much as I love wreath making, an 8 to 5 job calls for time-saving ideas.


I embroidered the text using the back stitch and kept the ribbon secure with an embroidery hoop. Burlap is very forgiving as an embroidery material. Super easy. And crazy-inexpensive!

I'm hoping to tackle some more embroidery projects soon. They are incredibly therapeutic and somewhat addicting. It must run in the family - my mom has told me that she used to stay up into the early hours of the morning while she was pregnant with me. Care to join? We can channel our inner old lady and stitch on the porch in rocking chairs with some sweet tea. Yes? Ok, great. Here's some inspiration:

[1,2,3,4]

6.11.2011

nesting

The future hubs and I checked out a potential first-home this morning. Exciting! It will certainly be quaint. And by quaint I mean small and a little crusty-old. But that just adds to the fun of making it feel like a home! As excited I've been for the wedding, I feel like I'm just as excited about the nesting that is to come. 

It got the brain ticking with decorating ideas, of course.

Here's a peek at my color/style inspiration. I'm hoping to find a happy medium (is it medium or median?) between the two. 


And this is what's on the wish list for our bedroom. 


Duvet (check!), shams, throw (check!), Mr. and Mrs. pillows (a coming DIY project), lamp (just inspiration), map

Don't worry...we'll get it all together so that you can come visit!

I'm not a big blog question ask-er. But, I do have one today. I'm just too curious - what makes you feel at home while you are away from home?

3.21.2011

banner DIY and a life catch-up

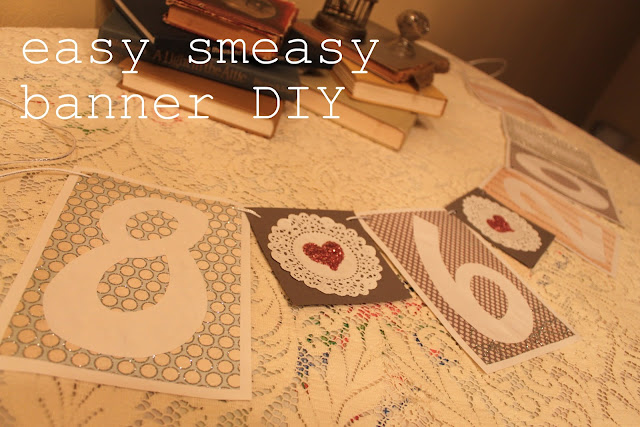
It's been too long, but I'm back with a tutorial to try to divert your attention from the fact that sometimes I'm a boring blogger. I'm sure you've noticed the adorable banner trend here in the blog-o-sphere. Loves it! I was trying to decide if I wanted to go with the pennant style or all doilies or felt or any of the other many options. So this is what my version turned out to be:


I made this banner for a very exciting reason - to use in our engagement pictures we took today! You can add this weekend to the list of huge blessings we've received through this whole wedding  process. We had more fun with Kevin Beasley, his artistic brain and wonderful heart, the beautiful weather and our homemade banner.


We also got to spend some time with the fam and register at Townsend House and Pewter Co. in Ruston where we had wonderful help with the whole [and sometimes overwhelming] registering process. Dustin was quite the trooper! If you are ever in the Ruston area, you should [definitely] pay these places a visit.


Aaand we got to see this cuteness all weekend:


Speaking of weddings, it's officially Natalie and Nathan's wedding week! Who's excited? THIS GIRL.